

How To Repair Broken Uknderground White Irrigation Pipe
Updated date:
How to Re-Screen or Repair an Old, Broken Screen
Ms. Millar has been an online writer for over eight years. She is well-versed in website development and has created several websites.
You can re-screen your windows yourself! It's easy, and they look great when you're done!
Jmillar
Re-Screen a Broken Window or Door Screen
Do you have an old window or door screen that has ripped, torn, or disintegrated altogether? You can replace it with ease. Is the frame broken at the corners? No problem! It can be re-screened, and it's as simple as anything you have ever done before!
That old, nasty screen window will look fantastic when you're done, and those pesky flies will stay where they belong: outside!
A DIY Screen-Repair Guide for Beginners
Just so we understand one another, I'm writing this article with the lay person in mind. This is not for the professional window-screen repair person (if there is such a person), or the gal with all the nifty tools in her garage. This is for regular Jane next door that wants the dang screen back on the window.
This is an easy fix, with tools that can be found around any home. In the box below is a list of the tools you are going to need to complete this little task, and the alternative tools that can be purchased.
| Tool | Description/Alternatives | Use |
|---|---|---|
| A Window Screen to Re-screen | It can be a broken window screen (if broken at the corners) | It can be a door screen |
| 1 Roll of Window Screening | It's purchased in a roll from hardware stores, Walmart stores, Target stores, Kmart stores, well you get the idea, almost anywhere! | There are several varieties of screen such as: heavy duty, pet screen, metal screen and standard. |
| A Butter Knife | A screwdriver works for me, or you can purchase a window screen roller. | This is used to press the plastic window screen retaining strip back in the groove. |
| Scissors | Razor blade, knife. | Use this to remove the excess screen. |
| A Square | Piece of paper, anything with two straight edges. | A square is used to make sure the screens sides are straight at the corners. I don't use one, but you may want to. |
Remove the Window Screen From the Window
Before we get started, you're going to need to get the screen out of the window frame it's in.
Your standard window screen is a snap to remove. There are two leaf type springs on the top of the window screen frame that hold it in position. You need to compress these leaf springs to get it out. From the outside of the house:
- Put your thumb and index fingers on the top metal part of the window screen while it's in the window.
- Press upward with your finger and thumb, like you are opening a window. The whole screen frame should move upward about a half inch. If it did not move at all, it's stuck. Press harder, or get a screwdriver and go to step three.
- Once you have pressed the screen frame upward a half inch, the bottom will sometimes pop out for you. If it doesn't use the tips of your fingers, or a screwdriver and slip it in the gap at the bottom of the screen that you create by pushing up on the top.
- Once you get the bottom of the screen pulled out, pull down and out and the top will come out.
Inserting the screen is the reverse of the previous four steps, but use the screwdriver or your fingers to press the bottom of the screen in once you have the top part in. Remember the top of the screen is the side with those leaf springs.
About the Screen Material
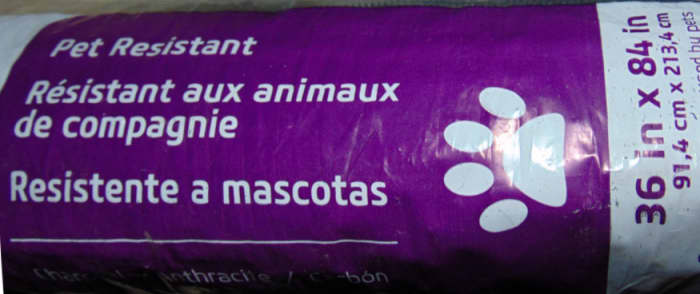
Window screens come in a variety of strengths. I use the pet-resistant screening. There's also standard screening and a wrinkle-free (wrinkle-resistant screen). They all work, but the pet-resistant screen will not shred as easily as the standard one. For about $20 per roll, it might be worth it to a pet owner. The pet-resistant screen will not resist Fido from bounding through it! It will not resist your cat climbing up it! It will hold up longer to these attacks, but not forever.
Read More From Dengarden
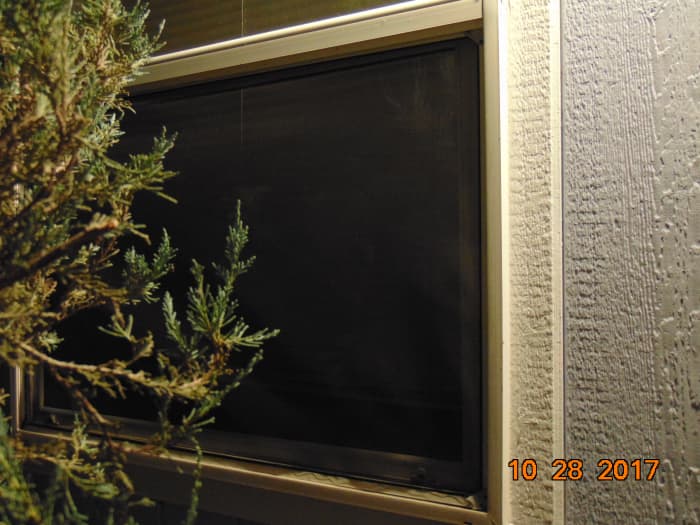
If you have pets that wreak havoc on your screen, your best bet is to put a metal wire mesh screen protector over it. The one I installed for my front door is shown below. I wanted something that would look nice because it is my front door, but not too expensive. There are different varieties you can choose from. I just liked this design.
How to Repair a Window or Door Screen
Choose an area where you can work with a flat surface (e.g. driveway, pool table, ping pong table, front room floor, etc.). Depending on the object you are re-screening, you must choose an appropriate size area.
You can follow along with the thumbnail pictures below, which have captions explaining which step is depicted. I am using a screwdriver, so I will be referring to a screwdriver when you can use one of the alternative tools (listed above in the table) if you so wish.
- Lay out your screen frame on the flat surface.
- Locate the ends of the rubber retaining strip inside the edge of the screen. Wedge your screwdriver in the gutter, and pick out one of the ends. Doesn't matter which one, just end one of the ends out.
- Take that end in one hand, and hold the screen down with your other hand, and pull the rubber retainer out of the gutter all the way around the screen.
- With the rubber retainer removed, you can pull any old screening out of the frame and toss it in the trash.
- I like to wipe down the rubber retainer with a cloth to get the dirt build-up off of it. Set the rubber retainer somewhere safe. If it becomes lost, it can be replaced at the hardware store. (If you have kids, put it up out of their reach, or you may find them chasing each other around the house whipping it around).
- You have the screening out now, and the frame lying there in front of you. Is it dirty? This is the time to clean it up. Do the grooves have build-up in them? Clean it out with a toothbrush and some window cleaner. If the corners are broken skip down to repairing corners.
- Leave the frame lying on your work surface with the groove (that you removed the rubber retainer from) facing up.
- Open your new screening material, and roll it out over the frame.
- DO NOT CUT the screening yet. Locate your rubber retaining strip, and lay it out along the groove, on top of the screen, matching corner to corner if possible.
Photo Guide
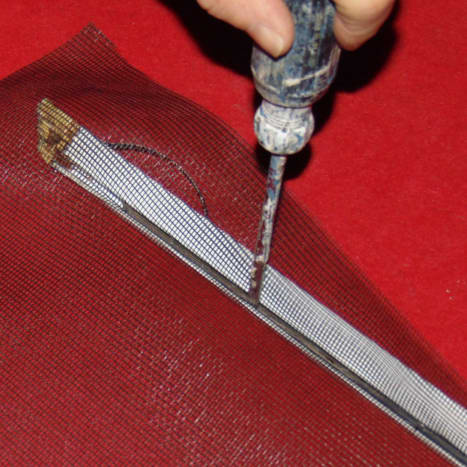
Start at one of the corners by pushing the rubber retaining strip into the groove. I chose the corner that was broken to begin with. It doesn't matter which corner you choose to start at.
Repairing a Screen's Corners
If the corners of your screen are broken, no problem. I have used all three of these methods successfully. Depending on the location of the screen, I would use the appropriate repair. Back door, something cheap and simple, front door, something nice to look at. There are three methods to fix this:
- Simple Repair (good for a single broken corner at the back door): Not really a repair but a look-away method (when the screen is done, just look-away from that corner). Line up the screen corners as they should be. Insert the screening and rubber screen retainer, the rubber will hold the screen frame in position. Be careful lifting the screen so it doesn't go out of whack.
- Actual Repair (when aesthetics is important): There are replacement corner inserts at the hardware store for the corners. Remove the broken one from the screen, and put the new one in and press the corners back together.
- Actual Strong Repair (good on front or back doors of multiple broken corners): Using metal triangles, purchased or homemade with some scrap sheet metal, these are placed across the corners and screwed in (some snap in) to reinforce the strength of the screen frame.
Inserting the Rubber Strip
This is the part that holds the screen in the frame. Take your time. Be careful with the tool you choose to press the rubber into the groove. You don't want to have your tool slip and rip the screen. Just take your time.
- Starting at one of the ends of the rubber stripping, push it into the groove with your screwdriver. Move down a few inches and push the rubber strip in again, move down a few inches and do it again. Pressing the screen in can be difficult sometimes. A small squirt of WD 40, or some spit, can go a long way here to make the rubber retainer slip in easier.
- When you come to the corner, stop. Go to the other side of the screen. Flatten the screening as you want it to look. Starting at the corner press the rubber strip into the groove, move down a couple of inches and press it in again, all the way to the corner. So, now you have the two opposite sides pressed in at intervals of a few inches.
- Step back and look at the screen. Is it wrinkled? Is it straight? Remove wrinkles by gently pulling on the screen at a corner or along the side. The rubber retainer will give a little so you can get the wrinkles out (especially if there's some WD 40, or spit in there). Do NOT pull it taut! If you pull it tight, you risk the screen becoming askew when you are done.
- When the screen is to your liking, go back and press the rubber retainer in all the way into the gutter (see short video above).
- Once those two opposite sides are in, start working on the other two opposing sides.
- If there is a broken corner, now is the time to line-up the broken corner into its position, so when you press in the rubber retainer, it will hold the broken corner in place!
- Now, press the rubber retainer in every few inches just like you did for the other sides. Move to the last side. Stand back and look for wrinkles you want to remove, gently pull on the screen to remove them.
- If it is nice a flat, press the rubber retainer into the grooves the rest of the way on both sides.
- Using scissors, or a razor, cut the remaining screen off along the edge. Be extra careful to NOT cut the inside screen, but just the extra outside portion.
You are done! Congratulations!
This article is accurate and true to the best of the author's knowledge. Content is for informational or entertainment purposes only and does not substitute for personal counsel or professional advice in business, financial, legal, or technical matters.
© 2017 Joanna
Related Articles
How To Repair Broken Uknderground White Irrigation Pipe
Source: https://dengarden.com/home-improvement/Re-screen-An-Old-Broken-Screen
Posted by: lennoxgoeve1998.blogspot.com
0 Response to "How To Repair Broken Uknderground White Irrigation Pipe"
Post a Comment